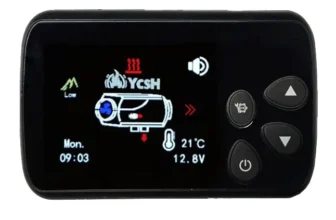
Switched on
When it is off, press for 3 second the on/off button or short press the power button.
on and off and the display will show the message “ON” and the operation lights on the display will illuminate on the display.
clockwise to indicate that the heating is turning on.
Off
When it is turned on, press for 3 second the on/off button or short press the power button.
on and off and the display will show the message “OFF” and the operation lights on the display will illuminate on the display.
counterclockwise to indicate that the heating is turning off.
Attention: During the shutdown and cooling process, it is not allowed to turn it back on..
Operating power adjustment
When it is turned on, short press the button “change up” o “downshift” to adjust the position of the
march. The screen shows “P-gear” and the gear light shows the same as the set gear position. Every press
brief 'upshift button'’ increases the working gear of the heater by one gear, and each short press of the
'shift down button’ reduces the working gear of the heater by one gear, with an adjustment range of 1 a 8 marches.
After adjusting the gear, the heater will work according to the set gear.
How to activate purged mode
When the machine is not turned on and there is no fault, Press and hold the “up arrow” button” during 3
seconds or briefly press the button “setting” to switch to pump fuel mode selection.
Then, hold down the button “setting” 3 seconds to activate the fuel delivery function
independent. The display shows 'P-E', indicating that the heater has entered independent pumping mode. After
activate independent fuel pumping mode, briefly press the “up arrow” button’ to stop the
fuel pumping. If the “up arrow” button is not pressed continuously, fuel pumping mode
will automatically stop after 3 activation minutes
How to activate Ventilation mode
When not powered on and in a fault-free state, hold down the button “downward arrow” during 3 seconds or
briefly press the button “setting” to switch to air supply mode selection. Then, keep
pressed the button “setting” during 3 seconds to activate the independent air supply function. The screen
sample “P_F’, indicating that the heater has entered independent air supply mode. After activating the
independent air supply mode, briefly press the button “downward arrow” to stop the supply of
aire.
How to associate the remote control
When the device is not turned on and there are no faults, press and hold the buttons “upward arrow” y “downward arrow” during 3 seconds at the same time, and the screen will show “—“, indicating that the heater has entered the pairing state with the remote control. In the pairing state, hold down the button “off” on the remote control to complete pairing. After successful pairing, pairing will exit automatically. After getting remote control pairing, short press any button to exit.
How to change the operating mode
With correct heater ignition, press and hold the button “upward arrow” during 3 seconds to
switch to constant temperature mode, and the screen will show “F+ constant temperature”. In constant temperature mode,
press and hold the button “upward arrow” during 3 seconds to exit constant temperature mode and
switch to drive mode.
Attention: In case of heater malfunction or shutdown, the heater will automatically exit temperature mode
constant.
Constant temperature regulation
In constant temperature mode, short press the button “upward arrow” o “downward arrow” to adjust the
constant temperature and the screen will show “F+ constant temperature “. Each short press of the arrow button
ascending’”increases the constant temperature set in 2 °C, and each short press of the “down arrow” button reduces the
constant temperature set at 2 °C, with an adjustment range of 18 °C -30 ° C. After temperature adjustment
constant, the heater will work according to the set temperature
Screen data
Short press the “Settings” button and the display will change to the current voltage, ambient temperature and altitude (no
available in non-high altitude models), case temperature, team code (not available on models that do not
son loT), current time, fuel pump mode selection, (not available in heater fault or ignition status),
air supply mode selection (not available in heater fault or ignition status) and cycle display
Time Setting
When the machine is not turned on and there is no fault, Press and hold the “Settings” button for 3
seconds to enter the setting state. The screen shows “A”, the settings icon flashes and the alarm icon
flashes, indicating that the system time setting has been entered. In the time setting state
system, Short press the “setting” button and the screen will show the system time. The first two digits of the
two dots will flash, indicating that the system time can be set in hours. Each short press of the arrow button
ascending” increases system time by 1 time, and each short press of the “down arrow” button” reduces the time of
system in 1 time, with an adjustment range of 0 a 23 hours. After setting the time value of the system time, press
briefly the button “Configure” and the two digits after the colon will flash, indicating that the system time is
can adjust in minutes. Press the “down arrow” button” briefly to increase system time on 1 minute and
press the “down arrow” button” briefly to decrease system time on 1 minutes. The adjustment range is 0
minutes to 59 minutes.
Use: If the device code is displayed on the screen, or when selecting fuel pump mode or fuel mode
air supply, you must briefly press the button “Setting” to switch to other screens and then press
hold the button “Setting” 3 seconds to enter the setting state.
Setting scheduled ignition
After setting the system time minutes value, Short press the “Settings” button, the screen will show
‘b’, the settings icon will flash, the alarm icon will flash and the ‘ON’ icon’ flashes, indicating that the
scheduled start time setting. In the scheduled start time setting state, briefly press the
button “Setting” and the screen will show the scheduled start time. The first two digits of the colon will flash,
indicating that the scheduled start time adjustment can currently be performed. Each short press of the arrow button
ascending” increases the programmed start time by 1 time, and each short press of the “down arrow” button” reduces the
programmed start time in 1 time, with an adjustment range of 0 a 23 hours. After setting the hourly value of the
scheduled start, Press the “Options” button briefly and the two digits after the colon will flash, what indicates
that the minute value of the scheduled start time can be adjusted. Each short press of the “up arrow” button”
increases the programmed start time by 1 minutes, and each short press of the “down arrow” button” reduces the time of
scheduled start at 1 minutes, with an adjustment range of 0 a 59 minutes.
Working time settings
After setting the minute value of the scheduled start time, short press the button “Setting”, the
display will show 'C', the settings icon will flash, the alarm icon will flash and the icon “OFF” will flash, indicating
the operating time setting has been entered. In runtime configuration state, press
briefly the “settings” button” and the screen will show the running time. The first two digits of the decimal point
will flash, indicating that the current runtime time adjustment can be performed. Each short press of the button
“rising arrow” increases operating time 1 time, and each short press of the “down arrow” button” reduce
operating time in 1 time, with an adjustment range of 0 a 23 hours. After adjusting the value of the sleep time hours
operation, short press the button “Options” and the two digits after the decimal point will flash, what indicates
which can be set the current minute of operating time. Each short press of the “up arrow” button” increases the
operating time in 10 minutes, and each short press of the “down arrow” button” reduces the time of
operation in 10 minutes, with an adjustment range of 0 a 50 minutes.
Use: If the run time cannot be set to 0 minutes, the on/off function will be invalid.
Repeat settings
After setting the run time minutes value, Short press the “Settings” button, the screen
will show “d”, the settings icon will flash and the alarm icon will flash, indicating that the
repeated configuration.. In the repeat setting state, short press the button “Options” and the screen will show
the current repeat status. “ON” represents repetition and “OFF” represents non-repetition. Each time you briefly press the
“up arrow” or “down arrow” button, the snooze state will alternate between on and off states. The logic of
synchronization part is as follows:
After scheduled start, to the same programmed start, The heater will automatically enter the start state when
no faults in the heater. After turning on the heater, when the heater operating time is the same
than the established operating time, The heater will automatically enter the cooling shutdown state. If he
scheduled repeat status is activated, after the scheduled shutdown is completed and the heater is
working without errors, at the same scheduled start time, the heater will enter the starting state again. If the state of
timed repeat is off, after turning on the heater, when the heater operating time is
same as the set operating time, The heater will automatically enter the shutdown state.
cooling and the timer function will be activated automatically. When the heater is on, keep
pressed the button “On/Off” during 3 seconds or briefly press the “On/Off button” to turn off the
heater to dissipate heat, and the timer function will turn off automatically. In case of malfunction of the
Heater, timer function turns off automatically.
Settings save and exit
After adjusting all settings, Press and hold the “Settings” button for 3 seconds to
save the current settings and automatically exit the setting state. After exiting the configuration state, and
Timed on/off function is set effectively, the alarm clock indicator will flash
slowly, the indicator “ON” will flash slowly and the indicator “OFF” will flash slowly. If the functions related to
voice are enabled, the sound icon will stay on. If voice-related features are disabled, he
sound icon will turn off.
Error codes
When the heater is in an error state, the screen shows a “fault code E+”. Except for failures related to the
fan, the heater automatically enters the shutdown and heat dissipation process. Once the dissipation of
heater heat, refer to the fault code for troubleshooting. After completing the resolution of the fault,
hold down the “on/off button” during 3 seconds or briefly press the “button
on/off” to restart, and the heater will automatically clear the fault screen.
Attention: After turning on the heater, if the fault has not been resolved, The heater will continue to display fault codes and
will enter the shutdown and cooling process again until the fault is cleared before ignition can
continue normally.
How to link the mobile phone App with the screen
We click several times on the configuration button, until it shows us the following on the screen: ID =

If we don't touch anything, a number will come out 4 fingers, and in a few seconds others 2 digits but, in total 6. Those 6 digits are the ones we have to put in the mobile application.
With the sim card inserted, and showing the ID on the screen, press and hold the configuration button between 3 y 5 seconds, until the coverage icon at the top left starts flashing, At that moment the screen will be in linking mode and we can continue in the app to make the link..
*Without SIM card or without coverage, the icon will not flash.

Android Version HC1.0.18

IOS App ch23 GSM
Video demonstration of APP synchronization – Screen ch23
CH23 GSM screen error codes
| error code | FAILED / ERROR / Solution |
|---|---|
| E01 | Voltage too high: check the power supply voltage. |
| E02 | Low voltage: check if the voltage of the power supply and battery is low or the wiring of the power supply is too thin |
| E03 | Cannot detect spark plug: check if the spark plug wires are connected incorrectly or replace the spark plug. |
| E04 | Cannot detect fuel pump: check if the fuel pump cable is loose or replace the fuel pump |
| E05 | Cannot detect engine: check if the motor cables are connected incorrectly or replace the motor. |
| E06 | Sensor not detected: check if the sensor wires are connected incorrectly or replace the sensor |
| E07 | Case overheating: check if the air inlet and outlet are blocked or replace the sensor. |
| E08 | Flame out: Check if the equipment lacks fuel or if the fuel pump has the intake pipe connected. |
| E09 | Misfire: check if the fuel circuit is supplying fuel to the equipment or if the power wiring is too thin. |
| E10 | High ambient temperature: check the air intake and keep it away from heat sources. |
| E11 | Temperature sensor malfunction: check if the temperature sensor is damaged. |
| E12 | Switch communication anomaly: check whether the switch box wires are connected incorrectly or replace the switch box. |
| E13 | Abnormal motherboard communication: check if the motherboard communication cables are connected incorrectly or replace motherboard. |
| E15 | Spark plug short circuit: check if the spark plug wire is shorted or replace the spark plug. |
| E16 | Fuel pump short circuit: check if the fuel pump wire is shorted or replace the fuel pump |
| E17 | motor short circuit: check if the motor wires are shorted or replace the motor. |
| E18 | Sensor short circuit: check if the sensor wire is shorted or replace the sensor. |