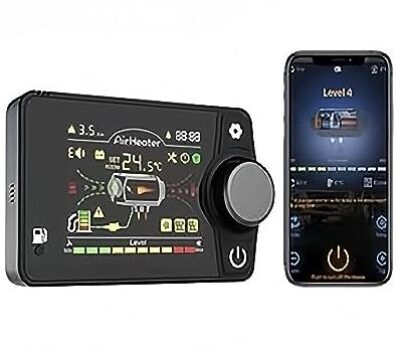


Manual Pantalla CH21 Bluetooth

  • Product
  • Photos
  • Deals
La primera Calefacción estacionaria PORTATIL china de 2kw Esta calefacción estacionaria PORTATIL, Supplied in a box with everything ...
Add to wishlistAdded to wishlistRemoved from wishlist 31

description buttons display ch21 chinese heating

Check pump configuration!
It is strongly recommended to check that the pump is set to 22ml, There have been cases where it has come in at around 16ml which causes smoke/charcoal..

Operating modes

Power mode: Has 10 functioning levels, of the 1 al 10, Once adjusted, it will remain that way until you modify it or turn off the heating..

Thermostat mode: In this mode you can choose between 8º and 36º, depending on the temperature you choose, The heating will automatically adjust the power necessary to reach it.. In this mode you can choose 2 variants:

  • normal mode: In normal mode when it reaches the temperature, It will remain running at minimum until it is necessary to increase the power to maintain it..
  • Automatic mode: In this mode the heating will be turned off., turning on again when the temperature drops.

Below I explain how to activate or deactivate normal/automatic mode..

Switched on / Off

To turn on the heating you just have to press the power button. The boot process will begin, turn on the fan, la bujia.. and after a few 40 seconds the fuel pump will start to sound, heat will begin to come out from the 3/4 minutes.

Change the Operating Mode

Turn the adjustment knob to change the heater operation mode. It will alternate between Manual Mode and Automatic Mode.

Adjust power or temperature

In it manual mode, rotate the button to adjust the output power, The power level will be displayed at the bottom of the screen.

In it automatic mode, turn the knob to set the desired temperature. The display will show the set temperature flashing.

Associate remote control

With the heating lit:

  1. We turn on the heating
  2. Press configuration button + Power button until EN00 appears on the screen.
  3. Turn the wheel until you go to the EN08 configuration section
  4. Press the setup button until it shows P1, but then there will be P2, P· and P4 each are a button on the controller.

P1 Up arrow, to raise temperature
P2 Down arrow, to lower temperature
P3 Operating mode change key “by power” o “thermostat mode”
P4 Corresponds to the ON/OFF button

Bluetooth

First download the AirheaterBLE application Apple / Android

Now we activate and configure the bluetooth password in the heating.

  1. We turn on the heating.
  2. Press configuration button + Power button until EN00 appears on the screen.
  3. Turn the wheel until BLE is displayed on the screen..
  4. At the top it indicates the password which is 1234

Change bluetooth password ( IT HAS NOT WORKED FOR ME)

After the 4 previous first steps.

  • press the adjustment button (rueda) for more than 3 seconds until the password flashes, in this case the 1234.
  • We turn the wheel and the password is modified, one click to confirm and exit, It would appear “SUc” on the screen confirming the change.

fuel level

To mark the 100% With the heating on you have to press for more than 7 seconds button n2, the one with a gas station icon

Diesel tank capacity configuration

While the heater is on, press the SET key for more than 4 seconds until the display shows F0 in the upper left corner and the time in the upper right corner. Turn the button clockwise to display F6.

Click the button to enter the setting mode and the capacity value will flash. Rotate the knob to adjust the capacity value in increments of 5 a 50 liters per step of 5 liters. When it appears “—” means this feature is disabled. Click the button again to save the setting value (by default it is 10 liters).
If you have a 2kw portable heater, the deposit is 2/3 liters, so this function would not be possible to use., because the minimum configurable capacity is 5L.

Select pump model

While the heater is on, press the SET key for more than 4 seconds until the display shows F0 in the upper left corner and the time in the upper right corner. Turn the button clockwise to display F7.

Click the button to enter the setting mode and the “Model/ML” of the pump will flash. Rotate the knob to adjust the value in 16-22-28-32. Click the button again to save the setting value and exit to the home screen.

Time setting and on/off scheduler

While the heater is on, press the SET key for more than 4 seconds until the display shows F0 in the upper left corner and the time in the upper right corner. Rotate the button clockwise to switch between F0-F1-F2-F3 options in loop.

  1. F0 is the machine time
  2. F1 is the start time
  3. F2 Time that will be on 00:00 a 10:00, a maximum of 10 hours until it turns off, with intervals of 30 minutes.
  4. F3 Active (t-on) deactivate it (t-of) the timer.

In an Fx option, Click the button to enter editing mode and click again to select the setting option. Click the ON/OFF key to exit editing mode. In edit mode, the screen flashes with the configuration data. The operating time adjustment range is 0.5 a 10 hours, with an adjustment step of 0.5 hours. While the timer display shows “t-oF”, the timer is off; if it shows “t-on”, timer is enabled.

Activate auto start/stop in thermostat mode

With the heating on, press the SET key for more than 4 seconds until the display shows F0 in the upper left corner and the time in the upper right corner.

Rotate the knob clockwise to display F8, then click the adjustment wheel. The screen will flash with “AUoF” o “HEs”, Mark the desired option and click on the adjustment wheel to save the changes.

  • HEs: The heating will turn off when reaching the set temperature..
  • AUoff: The heating will remain on permanently and when the temperature is reached it will be set to minimum..

The hysteresis (degrees of difference between on and off) It is preset by the manufacturer and cannot be modified.
Voice language

While the heater is on, press the SET key for more than 4 seconds until the display shows F0 in the upper left corner and the time in the upper right corner.

  • Turn the button clockwise to display F4
  • Click on the wheel. The screen will flash with the language selection.
  • Turn the knob to toggle between C (chino), E (English), R (Russian) o – (silence).
  • Click the button to save the selected language.

purged mode

  1. You have to disconnect the screen or remove the heating fuse
  2. We press the icon of the “gas station” at the same time we connect the screen or replace the fuse (WITHOUT LETTING IT GO)
  3. Hara a self-diagnosis, once finished, We continue holding down the gas station icon until a message appears. 300 on the screen and it will start purging, showing a countdown on the screen.
  4. When you press the off button, will stop.

CAREFUL!! If it is the portable version, it is NOT necessary to purge, on first boot, or it fails, In the second it will start on its own without the need to purge it.. If it is a model “normal” not portable, yes it is done until the diesel reaches the heating.

Purging excessively will cause a large amount of smoke to come out at start-up., and it would have to be left still until the smoke disappears, if we stop it, On the next boot it will happen again.

Height mode

This model can function correctly up to +o- 2200m in a timely manner can overcome them without problem, but it is advisable once you are below that height to turn it to the maximum and give it a go. 10-20 minutes at least to burn any possible trace of carbon that may be in the combustion chamber.

For long periods above 2200m it is advisable to upgrade to the screen ch22.

FAILED / ERRORError code on the screenSolution
Startup failureE-01No flame detected
Fuel supply failureE-02Diesel does not arrive
Incorrect voltageE-03Check the battery or power supply, that is between 11.5v and 14.5v
External temperature sensorE-04Check that it is well connected, yes it is, replace
Control unit temperature sensor failureE-05Replace control unit
fuel pump failureE-06Check that the fuel pump is properly connected, yes it is, replace it
Fan failureE-07Stuck fan, damaged cable / disconnected or fan shorted
Fallo BujiaE-08Spark plug/heater shorted, or not connected. check and replace if necessary
OverheatingE-09Air inlet or outlet clogged and the heating cannot be cooled
Overheating sensor failureE-10Temperature sensor short circuit, or not connected. check and replace if necessary

Tags:

Ycomosehace
Logo