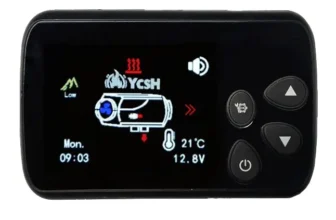
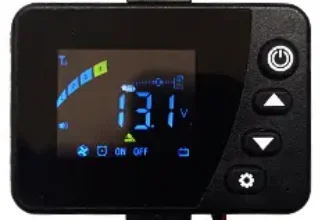
Main features:
- Automatic height mode up to 5500m.
- Bluetooth auto connect/disconnect, QR code on the back of the screen to make the connection
- Ventilation mode, con 5 Adjustable fan speed intensities
- Weekly start-stop programming. and manual mode and thermostat (It remains to be checked whether it turns off the heating in thermostat mode or not.)
- Screen turns off automatically if not touched.
- In ventilation mode it shows the ambient or outside temperature depending on the type of mounting.
- The screen has a voice, can be set without sound, ingles, Chinese or Russian.
Height mode
Works fully automatically, Approximately from 1500m this icon that I point out in the photo will light up and it will self-adjust to operate at height without needing to do anything, It will internally modify the air-diesel ratio for its correct operation..

Bluetooth mobile application
Depending on the type of mobile you have, Download the corresponding application to control the heating from your smartphone IPhone & Android
Behind On the screen you have a QR code that will have to be scanned to associate the heating with the APP, IT IS NOT DONE FROM THE QR READER. It is not necessary to remove it from the heating, since it has a support, It can be removed by prying it with the tip of your finger..
At the moment the App is in English, Chinese and Russian but it is possible that before summer 2024 the Spanish language is added.
Screen information
With the heating off you can turn the wheel with the OK button and it will show the following information.
Clock display → Case temperature display → Supply voltage display → Gear/temperature setting display → Altitude display → Fault code display.
How the buttons work
With the heating off
- To turn on the heating: Short press to turn on, and the panel shows ON.
- Power or degree adjustment: By turning the confirmation button clockwise or counterclockwise.
- Adjust settings: Press and hold some 3 seconds pressed the configuration button to adjust parameters,
- Confirmation button: Short press to see the different heating data cyclically.
With the heating on
- power button: Pressing of ones 3 seconds to erase, then the screen will show “OFF” and it will turn off
- Power or degree adjustment: Turning the confirmation button (OK) clockwise or counterclockwise.
- Confirmation button: Short press to see the different heating data cyclically.
Associate the remote control
With the heating off
Press and hold the setting button and at the same time turn the confirmation button counterclockwise (left) will show “-PE-” on the screen.
press the buttons ON and then OFF on the remote control to copy the remote control codes to the screen, once copied, by pressing on or off on the remote, or the same button on the screen, will exit the menu.
If no button is touched and it is inactive for 20 seconds, it will automatically exit without saving changes.
The remote control icon will always be on once the remote control has been synced.
purged mode
With the heating off
Long press the power button + the rotary button (OK) clockwise to access the purge menu, will show “020P”.
Turn the OK button to set the purge time. (The maximum manual oil pumping time is 120 seconds, default brand 20).
Short press the power button to start/stop pumping. Once the purge is complete, Briefly press the power button to exit or do not touch anything and in a few 20 seconds it will return to the main menu.
Operating modes
This screen has 3 operating modes.
- By degrees (thermostat mode without turning off the heating, raises or lowers the power to reach the temperature and then sets it to minimum) Shows AT on the screen.
- By power (You can select a power and it will remain that way indefinitely.) Shows MT on the screen.
- Thermostat mode (Turns off the heating when it reaches the indicated temperature) Shows AT on the screen with an arrow above it.
For some people, thermostat mode is a blessing., for others it is not, I explain myself, upon reaching the indicated temperature, the heating will turn off, and will start again when the temperature decreases below the hysteresis value, which will vary depending on the screen model.. These degrees will begin to count from the shutdown temperature set on the screen..
- Version v1 8º hysteresis
- Version v2 5º hysteresis
- Version v2.1 5º hysteresis
- Version v3 Adjustable hysteresis between 3º and 15º
When starting, Depending on the temperature difference between the ambient temperature and the selected temperature, the control unit will adjust the fan speed, adapting it to your needs., to reach the selected temperature as soon as possible, and then turn off again. By lowering said temperature below the hysteresis temperature (8º/5º depending on model) it will turn on itself again.
Depending on the size of your vehicle, and the external temperature, It would be better to use one mode of operation or another, With use you yourself will see which is the best way depending on your needs..
How to change operating mode
It can be done with the heating on., on or off.
- Press and hold the adjustment button + turning the button (OK) clockwise to switch to mode 1 (by degrees), the interface will show “27℃” and it will blink, Repeating the action will change to mode 2, by power, and the screen will show “P01”.
- being on, Press and hold the ON button on the remote control for 3 seconds to cyclically switch between mode1 and 2. You have to wait 3 seconds between changes.
- being off, Press and hold the OFF button on the remote control for 3 seconds to cyclically switch between mode 1 y 2. You have to wait 3 seconds between changes.
To activate the thermostat mode you must enter the configuration with the password (1234) in SET9. (Below I explain how to enter and activate the mode 3, thermostat mode with stop/start)
Temperature measurement unit
With the heating on or off, hold down the button “OK” to change between grades Celsius o Fahrenheit.
Adjust configuration parameters
With the heating off
Level 1 Menu selection
Long press the adjustment button for 3 seconds to enter the configuration menu, the screen will display “SET8“. Turn the knob to change options (SET 1 a SET 9).
Briefly press the OK button to enter options, Short press the power button to save and exit, or exit automatically after the button is idle for 20 seconds (without saving changes)
Setting the SET1 time to 7
Select SET1-7 corresponding to Monday-Sunday in the first level menu, Short press the confirmation button to enter, y “CLS” will appear in the top row. Turn the knob to switch between CLS, ON y LON, and short press the confirmation button to confirm.
- CLS (Back) Short press the confirmation button to return to the previous menu.
- ON (Boot) Briefly press the confirmation key to access the boot timer, had appeared “00:00 and the first blank space flashes. Turn the OK button to set the start time and press it to change digits. Next, Short press the confirmation button to enter OFF setting.
- ON. Initially it is displayed “00:00” and the first blank space flashes. Turn the knob to change the number,
y, next, Short press the confirmation key to access the next blank space. Briefly press the confirmation key
to return to the next first level menu item after adjustment. - LON (Start-up cycle timing)
Short press the confirmation button to enter the cycle timing start-up setting interface. Initially, “00:00”
and the first blank space flashes. Turn the knob to change the number and, next, Short press the confirm button to access the next blank space.
to access the next blank. Next, Short press the confirmation button to access the LOF setting. - LOF (off cycle timing)
Short press the confirmation key to enter the cycle timed shutdown setting interface after setting - LON. Initially, is displayed “00:00” and the first blank space flashes. Turn the knob to change the number,
y, next, Short press the confirmation key to access the next blank space. Briefly press the confirmation key
to return to the next first level menu item after adjustment.
SET8 Time setting
After selecting “SET8”, Short press the confirmation button to enter, and in the top row it will appear “-1-“. Turn the knob to change from Monday to Sunday.
Short press the confirmation button to switch to the bottom row display as “00:00”. Turn the knob to change the time.
Short press the confirmation button to switch to minute display. Once the minutes have been set, Short press the confirm button to skip to the next item (SET9) in the first level menu or short press the power button for 3 seconds
to save and exit, or exit automatically after the button is idle for 20 seconds without saving;
SET9 Configuration
- Entering the password Initially, sample “—-” The password we must enter is “1234” the first blank space flashes. Turn the knob to change the number and
next, Short press the confirm button to confirm and enter the next blank. The following numbers are
numbers in sequence and, finally, Short press the confirmation button to access the next setting when the
password is correct. - Voltage selection: Sample “12V” default, turn the knob to change, and you can choose 12V, 24V y AU (automatic
automatic). Briefly press the confirmation button to access the next item; - Power selection: Sample “H-5” default, turn the knob to change, and you can choose H-8 (8KW), H-5 (5KW) y L-2 (2KW).
L-2 (2KW). Briefly press the confirmation button to access the next item; - Pump type type selection: Sample “22ML” default, turn the knob to change, and you can choose 16ML, 22ML y 28ML.
Briefly press the confirmation button to access the next option. - Language language selection
Sample “L-C” default, turn the knob to change, and you can choose L-C (chino), The F (ingles) y L-0 (No sound).
(foreign language) y L-0 (silence). Press the confirm button to access the next item; - (ACTIVATE THERMOSTAT MODE) Sample “OFF” default, turn the knob to change, and you can choose OFF or ON to activate it. Press OK to access the next option;
- Shows 25º by default, Touching this parameter does not affect the operation in any way.. Press the power button to save changes and exit the menu.
Voice Adjustment
Will report only when interface is switched or state changed; report is not done during adjustment; The report is made when the
interface remains more than 1.5s during adjustment;
Use: (Voice button disabled: long press of the Confirm button + counterclockwise control);
Instructions to turn off the screen
- In standby mode (turned off): The screen will turn off completely if not pressed for more than 3 minutes.
- On: The screen will turn off after not pressing for more than 3 minutes If the screen is off, there will be a breathing light warning and
will be shown. Press any button to activate the screen.
Before first start
Before doing the first start, check that the pump is configured as 22ml What is the pump that brings the heating?, Otherwise the operation will not be correct..
List of ch22 screen error codes
| FAILED / ERROR | Error code on the screen | Solution |
|---|---|---|
| Low voltage | E-01 | Voltage below 10v in the 12v version or 18v if it is the 24v version |
| High voltage | E-02 | Voltage above 32v in the 24v version or 17v in the 12v version |
| Bujia | E-03/F1 | Short circuit in the spark plug |
| E-03/F2 | Open circuit | |
| diesel pump | E-04/F1 | Short circuit |
| E-04/F2 | Open circuit | |
| Overheating | E-05 | It has exceeded 260º obstructed air circuit |
| engine failure | E-06/F1 | Short circuit |
| E-06/F2 | Open circuit | |
| E-06/F3 | Hall sensor does not detect the fan | |
| Screen connection failure | E-07 | Check wiring and that the connector is well connected |
| Flame failure | E-08 | Air in the circuit, obstruction or lack of fuel |
| Temperature sensor | E-09/F1 | Short circuit |
| E-09/F2 | Open circuit | |
| Ignition failure | E-10 | 2 failed boot attempts, check that you get diesel, striped cuff, pump the blocked circuit |
| Room temperature sensor | E-11 | Open or short circuit |
| Control unit overheating | E-12 | The control unit is above 100º air inlet or outlet blocked or damaged control unit |

Last price update on 2026-11-17 at 17:12 Fuente: Amazon Affiliates